Thursday, December 5, 2019

Christmas 2019

Throughout the year I put my studio to use making advanced cards for Frantic Stamper's monthly card kits, and making videos of making the cards. (I will be sharing those videos here on the 12 days of Christmas...be sure to come check them out)!

I also got a great head start on my Christmas cards, enabling me to get them all done the earliest I have ever finished them! They were all mailed on December 2nd!

I would like to share the cards I made with you now, in case you werent one of the 96 card recipients this year.

First up is the card I made for each of my Mom's (RIP, Mom. I miss you so much!) sisters. Each of the dies used to make the card is one I designed for Frantic Stamper.


This next card is the one I sent to other close family members including my uncle, brothers, and two special cousins. This card used patterned paper and a single stamp, but still is a standout, don't you agree? I enjoyed engineering the popup!


This next card is one I made for a few close stamping friends who have come to expect kinetic cards from me. It is called a popup front panel card, and is actually a lot easier to make than it may appear. The gingerbread house and the Merry Christmas are also dies I designed for Frantic Stamper.


This card was created for my cousin's daughter's family. They have a young son who is probably nearing the end of his magical Santa time, so I wanted to do something to commemorate the time. All of the dies used on this card, and the santa, are ones I designed. The sentiment, though, is not one I drew. It came from a magazine inclusion, but was one that really said what was in my mind when I envisioned the card.


This card was made using an open card front concept shared by Jennifer McGuire. I love how it came out!


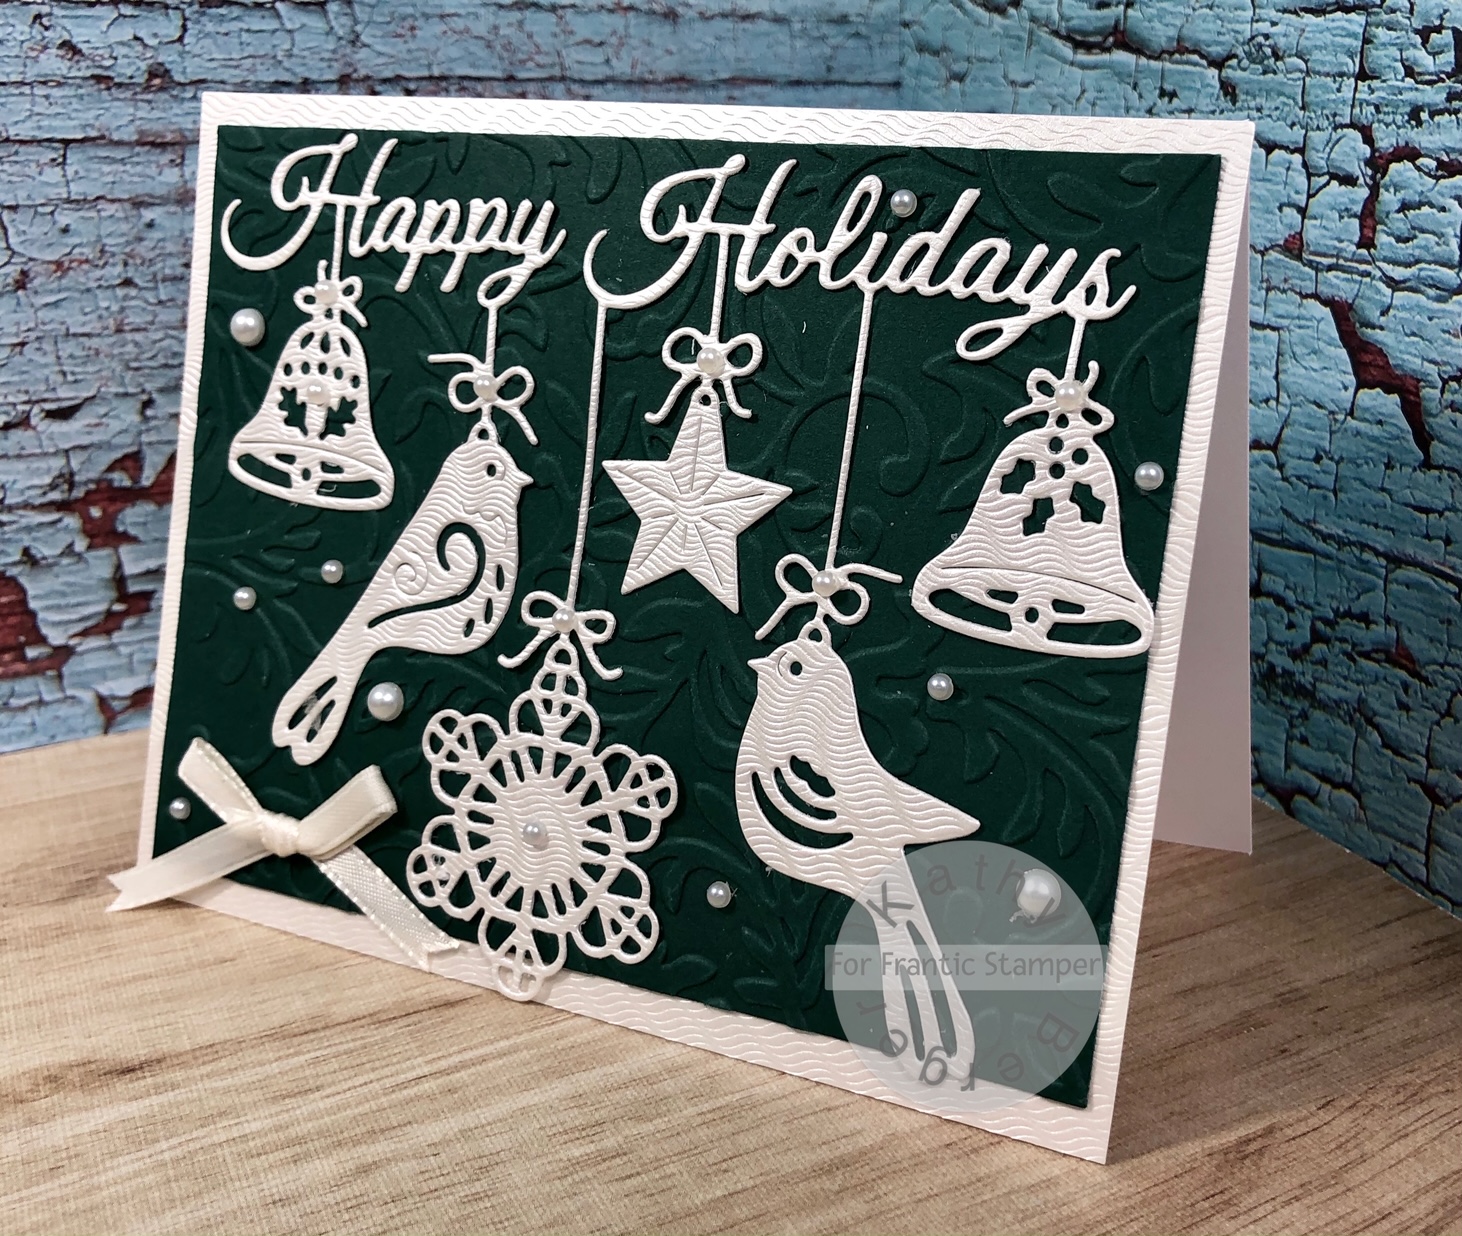
This card was a fairly quick one! All the lovely folksy ornaments and the sentiment were cut with a single die (again, one I drew for Frantic Stamper).


Here is another one that was fairly quick. it took two different dies to create the NOEL component, and because I had a limited amount of gold mirror paper I had to cut out the center of the gold layer to use for the NOEL, so it wasnt quite as quick as the Ornament card, but it was relatively quick when compared to the kinetic cards!


This card was created just for its snarky greeting. The trees and Santa are from Frantic Stamper clear stamps that I drew, and the Santa has a matching die that I used to cut him out. The bag was made from a facial tissue. This card didnt actually get sent to any of my friends or family as it was submitted to a magazine for potential publication.


Last, but not least, this card is the one that I sent to most of my friends. This card has penguins and a sentiment designed by a company called My Favorite Things. Those little guys took a LONG time to color. The hills were cut with a die set I drew, as was the label for the sentiment. This is the first Christmas cards I have sent out in YEARS that had elements I didn't draw. I couldn't help it, though, because I just fell in love with those fuzzy little guys!

Tuesday, November 26, 2019

My Studio

Last autumn I decided to go ahead with the project to build a little studio in the far back corner of my back yard. Building something had been in the plans for a while. The building was erected in early November, and the work on finishing the interior was completed just days before Christmas.

Once I got the keys there came the physically demanding task of moving the boxes and boxes of unassembled furniture to the building, first across the back lawn, then across the muddy, slippery un-landscaped yard in our second yard. It required many trips hauling a garden wagon loaded with the boxes, one piece of furniture at a time. When I got the pieces moved I assembled them, and moved the furniture into place. First there was the counter piece with the set of drawers, then the desk unit. Next came the hardest job, the assembly of my Craftbox, which came in a huge wooden crate with 6 large boxes of components. It took me three days to just assemble the five cabinets that comprise the unit, and another to connect them! and yet one more to add all the shelving and storage boxes that came with it. I then assembled the 2x2 Kallax unit from Ikea that I would use for 8.5"x11" cardstock, and lastly the 4x4 Kallax that I would use for storing stamps, adhesives, and manual die-cutting machines. Notice I said "I"; I did all that by myself!

Once the furnishings were all in place, I had to begin the Herculean task of hauling my supplies from the house to the studio, sorting it all, and putting it away. It was a several week-long job! I was determined to ensure that everything was organized and labeled so I could find anything I needed quickly. The final step in my organization efforts was the creation of a database and a full inventory of my stamps, dies, embossing folders, and stencils. Every one of those items has been added to the searchable database, with photos, keywords, and location information to make it easy to find the right item every time. All that extra work was so worth it! I can lay my hands on whatever I want pretty quickly, and the organization makes it easy to put things away, too.

Here are some photos of the space, though they are a little outdated; I have better organized my pegboard and craftbox, but you should get a fair idea of the functionality of the space.

This photo shows the valance I macraméd for the window over my desk. I still need to make another for the other window. I hope to get started on it soon. Now that my Christmas cards are done I have a window to be able to work on it.


This photo is of my work desk itself. I love the view I get when seated at the desk, though right now it is not yet green outside. With all the rain we have been getting of late, though, it shouldn't be brown much longer!


This is a section of my 7' of pegboard. I have reorganzed the pegs, which now hold macramé cord and baker's twine. i have added three more wire baskets that each hold small mason jars. The other wire baskets now hold my stash of cards for whenever I need one but dont have the time to make one. My daughter, though, tends to use the stash more often than I do!


This is my Craftbox right door wide open, also showing more of the pegboard and my rolling carts. I generally leave the Craftbox open unless I am using the space for something other than card making. I like having the quick access to the dies in and on the door (the outsides of both of the smallest doors are magnetic; they hold dies from MFT and Lawn Fawn that make kinetic cards) and all of my patterned paper, but mostly I enjoy having the doors open and the table set up because that is where I do my die-cutting.


This is the center part of my Craftbox. You can see my eBosser and plates in the background. The box contained scraps of paper that I went through and organized. I cut anything that was big enough down to A2 size and organized it by color family. Smaller scraps were cut to no wider than 5.5" and no taller than 4.25", and also organized them by color. I find I actually use my scraps now because they are actually handier than cutting down a sheet of paper!

My Cricut Maker is below the table, as is my Minc for foiling.


This is my large Kallax unit. I have stamps, adhesives, magnet sheets, foil and vinyl in the fabric bins. Below those I have mounted stamps, clear stamps with matching dies, my Xyrons, my coloring media, and my manual die cutting machines.


Here is a little video I made to help show how everything is oriented. I hope you will enjoy it!

Thursday, December 14, 2017

Fun Wintery Card


I am finally back with another post! My design duties for Frantic Stamper, my health issues, plus some major projects on my house have mostly kept me out of my craft space this year. But it is time for Christmas cards, so no matter what else might be happening in my life, it is time for me to stop everything and create cards!

This card is one I made for my brother and his wife, but I also thought I would share it with you!

All of the diecuts on this card are ones I designed for Frantic Stamper, as is the sentiment stamp. The outside of the card is a Copic-colored Sweet Holly Snowman on a snow-covered Stiched Scene-builder Edger hill. The Joy is from the Slender Peace and Joy set. I think it is a sweet card, but what makes it truly special is the inside!


This is a twisting popup card that I decorated with more snowmen, a snowflake and a snowbuddy sentiment.


i didnt just want to share the photos of the card, though. I also want to share how to make and decorate the Twisting Popup Mechanism. So...here we go!

Make the Mechanism
Score full size sheet at 5 1/2” in landscape orientation.
Cut off 1/8” from each end, making the piece 8 1/2”x10 3/4”. 
Score at 2 1/4”, 4 1/4”, and 6 1/4” in portrait orientation. 

Fold on 5 3/8” score line. Reinforce the fold with bone folder.

Mark 1” from the fold on both edges.
Mark 1 1/4” from the fold on the first score line from each edge.

Draw a line from the 1” mark to the 1.25” mark on both sides.
Cut away the piece formed by the drawn line and the score, from edge to edge.

Open the mechanism. Make sure it is in portrait orientation.
Mark 2” from horizontal center fold to each vertical edge of the mechanism.
Score diagonally across the center of the mechanism, from mark to mark.
Fold on both scores and reinforce the fold with bone folder.

Squash fold the mechanism so the wings are inside the mechanism, and the mechanism resembles a pocket.


Decorate the Mechanism
Cut two pieces 3 3/4”x5 1/2”. Mark the center of each piece in portrait orientation, then mark 1 7/8” from the top on each edge.
Cut diagonally from edge mark to center mark on both sides.
Trim bottom to be 1/8” from bottom of mechanism.

Attach mechanism in a top fold card, 5.5” tall x 4.25” wide, making sure the mechanism is strait and the point is in the fold.
Make the Accordion Panels
Cut strip 2 3/4”x11”.
In landscape orientation score at 2 3/4”, 5 1/2”, and 8.25”.
Accordion fold the piece; valley, mountain, valley.
Attach the Accordion Panels
Put strong adhesive on the lower left and upper right outside edge of the mechanism.


Place the folded accordion panels centered on the lower edge of the mechanism, folds at the top.
Close the card carefully to ensure the adhesive on the top right does not touch the accordion panels.
Open the card. Close the card again, pulling the folded accordion panels to be on top of the right side of the mechanism.
Open the card.
Decorate the Accordion Panels
Cut four pieces of the decorative paper to 2 1/2” square and affix to each of the four panes of the accordion panels.
Decorate with stamped images or die cuts.
So now that you have learned how to make the mechanism, I hope you will make a twisting popup card of your own! Feel free to share a link with the inlinkz button below.

Thursday, January 5, 2017

Mom's Christmas Card, 2016


The time has come for me to share my mom's Christmas card. As you may remember, my card for mom is the first card I tackle when I start to make my Christmas cards. It is always the most challenging one to make, and the most unique.

This year I decided to jump on the chibi light band wagon and make a card with lights. I wanted to make the card a pop up, with back lighting for each of the main elements on the inside of the cards.

I die cut several of the buildings and multiple trees from the FranticStamper "village" dies, using 110lb white cardstock.

Village Church

FRA-Die-09540

Village School House

FRA-Die-09542

Village Candy Shoppe

FRA-Die-09543

Village Grocery Shoppe
FRA-Die-09544

Village Book Shoppe

FRA-Die-09545

Village Victorian

FRA-Die-09546

Village Cottage

FRA-Die-09547

Village Shrubs and Trees
FRA-Die-09546


I also die cut a few tree and hill edgers for the background.

Hill With Pine Trees Edger
 
FRA-Die-09178
Evergreen Forest Edger
 
FRA-Die-09446

Stitched Scene Builder Edgers
 
FRA-Die-09403


And then, I die cut Santa's Sleigh and his reindeer out of black cardstock, and punched a 1.25" circle out of pale yellow card stock.
Santa's Sleigh
 
FRA-Die-09622


It is far too complicated to fill in all of the details of how I made the pop ups, and how I wired the chibi lights but I will give you a bit of a description of the steps I took.

The four pop-up bases are each 1/2"x7" box mechanisms. I started with a 7"x2" strip of cardstock and scored it lengthwise at every .5". I used strong tape on the first and last of the four areas of the mechanism created by the scores. I aligned the two edges of the box piece with the fold of the card and closed the card to affix them in place. When the card was reopened, there was a 1/2" tall and 1/2" deep box across the base of the inside of the card. I glued the very bottom of the church to the center of the front of the box, very close to the top of the box. I then repeated the process with more 7"x 2" panels, creating boxes that become attached to the base of the card and to the box behind it, and adding buildings and evergreen trees to the boxes. I used a total of four box mechanisms. On the last box I attached a few trees and a hill cut with the stitched hill Edgers.

The wiring followed the Chibi directions for multiple lights on a circuit, with the positive and negative copper tape winding in parallel lines from the top right of the card inside down the inside of the card front, then meandering through the village. I covered the wiring with strips of 1/2" 80lb card stock with 1/8" holes punched at each light.

I created the snowy base with texture paste smeared onto the scene with a finger, and then sprinkled liberally with diamond dust.

The battery is housed in a pocket made from a rectangle of card stock folded over the battery. The copper tape connects to both inside sides of the folded rectangle. The battery itself sits on the negative lead but is surrounded by 3 layers of foam tape, ensuring that the connection to the positive side of the battery can only be made only by pushing the top of the folded rectangle.

The blue layer was made by by sponging blue inks onto white cardstock. It is attached with 3 layers of foam tape at the top, to align the top with the level of the tape around the battery housing. The panel was attached with glue tape at the bottom. The tree lines and snowy hills were attached with foam tape, building up to 3 layers of foam tape thickness, making the top and bottom of the card flush with each other. The moon was place over the battery to mark its position as well as to add another feature to the image. The stars were cut from white cardstock (covered with Tulip glow-in-the-dark paint) using the starfall  and the Northern Star dies and then were affixed randomly.


Northern Star

FRA-Die-09246

Starfall Background

FRA-Die-09614


The last element I added to the inside of the box was the Script Merry Christmas, die cut from deep red cardstock.
Script Merry Christmas
 
FRA-Die-09249


The front of the card was made by layering a piece of glow in the dark painted card stock onto a dark blue piece of cardstock, and then layering on top of that a piece of cardstock, sponged dark blue and die cut with the same star dies on top of that. Finally, the Peace on Earth was diecut from white cardstock and added to the card front.
Large Peace on Earth
 
FRA-Die-09248


Mom enjoyed the card. I hope you did as well!

Thursday, December 1, 2016


Check out Frantic Stamper's video slideshow for their new release, Visions of the East.


Fran is also having a giveaway of one of the newest dies, the Kokeshi Japanese Doll. I know this is going to be one of my all-time favorite dies. Be sure to check it out, and play along!


And they are having a design team call! If you have ever thought you would like to design with awesome dies and stamps with a fabulous team this is the time to give it a try!

Wednesday, December 23, 2015

Finally another post...

I have to admit that I am a terrible blogger. I can't stay on a schedule. I have no time. I seldom stamp cards any more, and I generally have nothing to say.

But once a year I do sit down to make a card that I hope is special: a Christmas card for my mom.

I spend a lot of time on Mom's card, first prototyping the mechanism, then building the components, and finally constructing the actual card.

This year Mom's card is a snowy log cabin in a thick forest, surrounded by snow-covered hills, and with majestic mountains in the distance. The mechanism is a simple side-step card in a 8.5"x5.5" format.

Due to the weight of the card I had to add a ribbon to the inside of the card to keep it from opening too far when standing; not only is there a lot of card-stock adding weight in the layers of the card, but the artificial snow is quite heavy.

Here is the card from the front...


Now I have a close-up of the cabin side of the card:


...and a close-up of the step side of the card:


And lastly an angled view to show the dimension in the card:


By the way...every die I used to make this card was one I designed for Frantic Stamper. Isn't it wonderful how well they all work together? I not only enjoyed designing them, but I really enjoyed finally using them to make this card!


I won't promise to blog more often in the coming year, but I can and do wish you a happy year ahead. And I can promise, God willing, I will be making Mom another special card next Christmas.

Monday, October 26, 2015

Copic Marker Storage


I have something I just couldn't wait to share! Don't you just love it when you fix a problem that has been bothering you for a while, and not only did it work for you, but it wasn't expensive, and was really simple to do? Well here is one of those problems, solved!

I recently completed my collection of Copic Sketch markers (YAY!!) and faced the daunting task of storing them all (BOO!!). I had bought the Copic Carrying Case thinking it would be a great solution because it is compact and portable, but when I got it I realized the six little mesh bags for holding the markers that were included with the bag were far from perfect for me. They tipped over if they weren't full, they made organizing by color family impossible, and they didn't allow me to have my markers organized numerically, either. I really needed something different.

First I tried the plastic lighting grate used in plastic boxes that I saw on Pinterest as a solution, but it didn't work with the Carrying Case because 1) it is rectangular but the case has rounded corners and 2) if I cut the grid so it could fit in the box it wouldn't hold all the markers.

Next I tried putting in some large plastic tubs to hold the markers but that didn't work out either. Because they were tapered to be smaller at the bottom they didn't hold as many markers as I thought they would, and I still couldn't organize the markers by numbers.

Then I thought about what made the plastic light grating be such a good solution, and I realized it was all about the grid. (Now I have a song stuck in my head...It's all about da grid, about da grid. No worries. Lol.)

How could I get a grid that would be a perfect fit for the case while still holding enough markers? Thinking about grids brought netting to mind. If only I could find a mesh with just the right sized gaps, I thought it might just work. But then I couldn't find any nets with the grid size I needed.

And then came the AHA moment! I suddenly remembered that I know how to crochet, and that I knew a few different patterns that would make lovely meshes. Ta duh da dah... within an hour or so I had crocheted the PERFECT (for me, anyway) solution!

I used a very simple square mesh stitch to create the perfect "netting" for my markers. And better yet, I sized it so I could velcro it into the carrier so if I ever need to remove it I can! For those of you who crochet, click for my pattern.


Once I had my grid piece ( 17 or 18 posts across and 26 rows long) I simply wove a piece of Velcro One-Wrap™ through the first row, up the first column, across last row, and down the last column, with the hook side to the outside.


I then affixed it to the inside of the carrying case, which is lined with a perfect fabric for the Velcro to grab!

When I started putting my markers in (in VIBGYOR and numerical orders, of course...I am a bit OCD that way) I found that the rows of markers were not staying straight, making it hard to see the organization. SO... I cut 23 pieces of very heavy black card-stock (poster board would have worked well, too) to 8.75"x 2.75" and "laminated" it with clear Contact paper. I inserted the card-stock between the rows.


PERFECTION!


I have room on top to carry a refiller for my clear marker, a small spritzer filled with blending solution, my ring of textured fabrics, etc. for adding texture to my colored pieces, a set of Spica glitter pens, and a set of .3mm Multiliners. Not only do they store perfectly, but it is all super portable so I can take them to stamping get-togethers.

I can't tell you how tickled I am with my solution! So, how do you store YOUR Copics? Please share!