
I am finally back with another post! My design duties for Frantic Stamper, my health issues, plus some major projects on my house have mostly kept me out of my craft space this year. But it is time for Christmas cards, so no matter what else might be happening in my life, it is time for me to stop everything and create cards!
This card is one I made for my brother and his wife, but I also thought I would share it with you!
All of the diecuts on this card are ones I designed for Frantic Stamper, as is the sentiment stamp. The outside of the card is a Copic-colored Sweet Holly Snowman on a snow-covered Stiched Scene-builder Edger hill. The Joy is from the Slender Peace and Joy set. I think it is a sweet card, but what makes it truly special is the inside!

This is a twisting popup card that I decorated with more snowmen, a snowflake and a snowbuddy sentiment.

i didnt just want to share the photos of the card, though. I also want to share how to make and decorate the Twisting Popup Mechanism. So...here we go!
Make the Mechanism
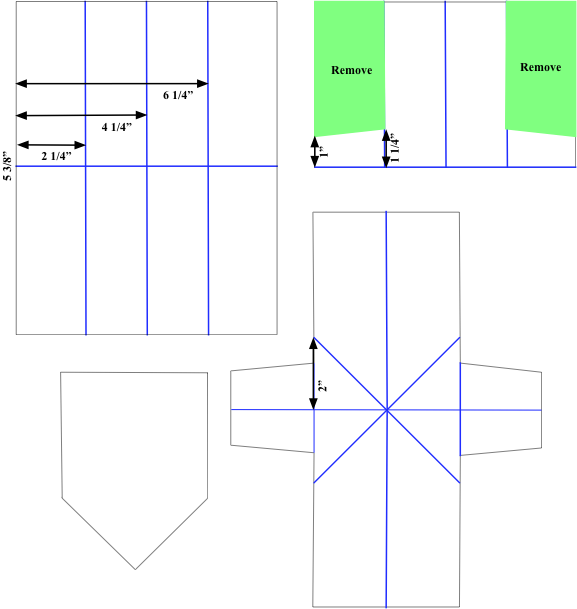
Score full size sheet at 5 1/2” in landscape orientation.
Cut off 1/8” from each end, making the piece 8 1/2”x10 3/4”.
Score at 2 1/4”, 4 1/4”, and 6 1/4” in portrait orientation.
Fold on 5 3/8” score line. Reinforce the fold with bone folder.
Mark 1” from the fold on both edges.
Mark 1 1/4” from the fold on the first score line from each edge.
Draw a line from the 1” mark to the 1.25” mark on both sides.
Cut away the piece formed by the drawn line and the score, from edge to edge.
Open the mechanism. Make sure it is in portrait orientation.
Mark 2” from horizontal center fold to each vertical edge of the mechanism.
Score diagonally across the center of the mechanism, from mark to mark.
Fold on both scores and reinforce the fold with bone folder.
Squash fold the mechanism so the wings are inside the mechanism, and the mechanism resembles a pocket.
Decorate the Mechanism
Cut two pieces 3 3/4”x5 1/2”. Mark the center of each piece in portrait orientation, then mark 1 7/8” from the top on each edge.Make the Accordion Panels
Cut diagonally from edge mark to center mark on both sides.
Trim bottom to be 1/8” from bottom of mechanism.
Attach mechanism in a top fold card, 5.5” tall x 4.25” wide, making sure the mechanism is strait and the point is in the fold.
Cut strip 2 3/4”x11”.Attach the Accordion Panels
In landscape orientation score at 2 3/4”, 5 1/2”, and 8.25”.
Accordion fold the piece; valley, mountain, valley.
Put strong adhesive on the lower left and upper right outside edge of the mechanism.Decorate the Accordion Panels

Place the folded accordion panels centered on the lower edge of the mechanism, folds at the top.
Close the card carefully to ensure the adhesive on the top right does not touch the accordion panels.
Open the card. Close the card again, pulling the folded accordion panels to be on top of the right side of the mechanism.
Open the card.
Cut four pieces of the decorative paper to 2 1/2” square and affix to each of the four panes of the accordion panels.So now that you have learned how to make the mechanism, I hope you will make a twisting popup card of your own! Feel free to share a link with the inlinkz button below.
Decorate with stamped images or die cuts.
Fabulous snowman design and love the accordion folded panel card.
ReplyDeleteHugs Diane