Tuesday, March 16, 2010

Colored Pencil Blending


A popular method for coloring stamped images is the “Magic Colored Pencil” technique, which uses a solvent to blend the colored pencils, eliminating pencil lines and leaving a watercolor-like effect. The original version of this technique used PrismaColor Premier colored pencils and Gamsol odorless mineral spirits, with wonderful effect. A while ago
I became curious about the technique, and wondered if there were a less expensive alternative to the expensive technique. I often travel, and also often share my stamping materials, so I thought it would be wonderful to have an alternative that I wouldn’t mind sticking into my travel case and sharing with a group.


I had heard that Goo Gone worked well in place of the Gamsol, and that its orange odor bothered some people a lot less than the “odorless” fumes from the Gamsol. Being asthmatic, and suffering from occasional migraines, the fumes were a concern, so I thought I’d check out the Goo Gone.


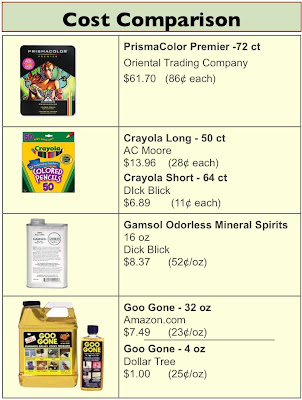
I also decided I’d check out something else while I was at it. I have used Crayola colored pencils since my childhood, and have always enjoyed their bright, vivid colors. I am especially a fan of their short pencils, which are inexpensive and highly portable. To the right you can see the price comparisons.


I opted to compare the results of the blending technique on each of the types of pencils with each of the types of solvents, and thought I’d share my results with you. I used a two-tipped rolled paper stub for this experiment, using one end of the stub for mineral oil, and the other for Goo Gone. I wanted to make sure I was as consistent as possible. I used a single sheet of white card stock for the comparison.
As you will see from the photos on the next page, the results with the Crayola/Goo Gone are quite comparable to the PrismaColor/ Gamsol.


Preparation



I stamped my “Just Ducky” image four times, using Versafine™ black ink. The two images on the top of the page were colored with PrismaColor pencils, while the bottom two were colored with Crayola. I used the outline method of applying color, putting down color around the edges of the image, only.


Blending


I blended each image, a single color at a time, using the stub, which I sanded down between colors. I used only Gamsol on the images on the left, and only Goo Gone on the images on the right.


Results


Can you see an appreciable difference between the quality of these images? I certainly couldn’t, with the exception of the brighter yellow and orange in the Crayola images and a slightly darker blue in the PrismaColor images.


They all came out “Just Ducky” to me!


All four images worked well, with color-blending nearly effortless. Both blending media worked well, though I felt it was a little easier to move the color with the Goo Gone. That could be an advantage, or a disadvantage, depending on what one is trying to do. I found that with both of the images with the PrismaColors, I had a little trouble with picking up black from the ink for the image itself, even though those were the first two images stamped. I probably should have heat-set the Versafine ink. I did not experience the same problem with the Crayola pencils.


The largest differences in the pencils were in how easily the color laid down and in the colors themselves. I found the PrismaColors a little softer and smoother, and thus a little easier to lay down.


But for the expense of both the pencils and the blending materials, I think I will likely travel with Crayola and Goo Gone from now on!


Follow-up


I have been using the Crayola/Goo Gone combination for a while now. However, a couple of days ago, I spilled half my little bottle of Goo Gone onto a nearly finished project. The project was ruined as the Goo Gone left behind a stain on my colored card-stocks. I suspect the Gamsol would have done the same. But the spill definitely spurred me to find a way to use my blending liquid.


I found a set of two little iGo brand travel jars at one of my local stores, for a mere $0.89 for the pair. I also got a package of round makeup sponges. I was able to compress one of the makeup sponge and fit it into one of the jars. It fit quite neatly! I then poured just enough Goo Gone onto the sponge to saturate it. When I want to blend my pencil, I simply press my paper stub against the sponge and just enough Goo Gone is transferred to the stub. The cap fits tightly on the jar and the jar has a much lower likelihood of getting spilled over than the little bottle. I think I won't have to worry about another card getting ruined by a spill!

Tuesday, March 2, 2010

Punchy the Owl

MATERIALS:

      EK Success Whale of Punch - Bracket
      1 3/8” EK Success Circle Punch
     
 1/2” EK Success Circle Punch
      
1” McGill Daisy Punch
     
 1/4” Round Fiskars hand punch

     
Stewart Superior Memories Ink - Brown
     
American Craft Ultimate Gel Pen - White Pastel

     
Brown marker or colored pencil (optional)
     
3” round Hydra Sponge

     
 4” x 4” scrap of craft card-stock
     
 1 1/4” square of yellow or orange card-stock
     
 Small scrap of white card-stock
     
 Small scrap of black card-stock

     
Adhesive of choice

INSTRUCTIONS:

PUNCH:

     
From Craft card-stock
     
     
 1 x Curly bracket
     
     
 2 x 2” Scallop Circles
     
     
 1 x 1 3/8” Circle
     
     
 1 x 1/2” Circle
     
From Yellow/Orange card-stock
     
     
 1 x 1” Daisy Punch
     
     
 also hand cut one small triangle for the beak
     
From White card-stock
     
     
 2 x 1/2” Circle
     
 From Black card-stock
     
     
 1 x 1/4” Circle

PREPARE:

     
• Cut 1 of the scalloped circles in half. Trim if desired to form wings.
     
• Trim about 1/4” from one side of the 1 1/2” craft circle, making a flat edge.
     
• Cut the 1/2” craft circle in half.
     
• Cut the orange flower in half. Remove 1 petal from each half.
     
• Sponge brown ink around outside edges of all brown or white pieces.
     
• Draw “feathers” on whole scallop and wing pieces as desired.

ASSEMBLE:

     
• Glue wings to front of chest, attaching only near the top of the wings.
     
• Glue head to chest with the flat edge on top.
     
• Glue bracket to top of head to form ears.
     
• Glue white circles below the bracket, making sure they touch each other.
     
• Carefully glue beak into place, inserting under the white circles.
     
• Glue black circles onto the white circles, making eyes.
     
• Glue the craft half circles over the eyes, making lids.
     
• Use the white gel pen to draw highlights on the eye centers.
     
• Glue the partial daisies at the bottom, from behind the chest piece, to form feet.

Thursday, February 18, 2010

Quick and Easy Gift Cards


Six square gift cards from one sheet of card-stock


A bit of masking, stamping, and scoring, plus a few very simple cuts provide the bases for six 2 3/4” square cards. They’re so quick, easy, and cute; you’ll want to make a batch for every occasion!


• Start with a single sheet of 8 1/2” x 11” card-stock. Cut 1/4” inch off the width, leaving a sheet 8 1/4” x 11”. Score across the card-stock 2 3/4” from the top and from the bottom.


• Mask the top and bottom of the card to the score lines. Using a rainbow ink pad or multiple coors, randomly stamp images between the masks, being sure to stamp off the edges and onto the masks. Be random; make sure the images are stamped right side up, upside down, sideways. Try not to make an obvious pattern with the images. This is the same as the One Sheet Wonder technique, but only on the center portion of the sheet.


• When you’re done stamping, cut the sheet in half, making two 8 1/4” x 5 1/2” pieces.


• Next, cut each of the two pieces in thirds, making a total of six pieces, 2 3/4” x  5 1/2”. Fold and crease each of the pieces on the score lines.


• The cards can be used just as they are, or they can be embellished with layers of card stock, ribbons, buttons, or bows. 


• To make a petal envelope, start with a square of text weight paper, 6" x 6". Cut squares 1 1/2" from each corner. Corner round the corners of all the tabs that are left. Fold the tabs in, tucking the edge under the one to its right. Use a sticker to seal the center.


* Note: These cards are NOT mailable, but they are perfect hand carried, or to accompany a gift.

Saturday, February 13, 2010

White on White Pop-up gift card holder


This white on white format card is perfect for a wedding, First Communion, or a christening gift. Though it looks like it is hard to make, it really is quick and easy, once you master a couple of basic techniques.
The front of this card is adorned by using Cuttlebug border embossing folders and a simple technique to eliminate edge marks and with straight lines embossed using the Scor-Pal. 
The inside of the card, which features a simple pop-up mechanism,  holds a standard sized gift card.
Getting Ready
Materials:
  • White card stock (front panel -4” x 5 1/4 ”, card -  4 1/4” x 11”, pop-up mechanism - 4. 1/4” x 5” )
  • Scor-pal 
  • Cuttlebug machine, and plates
  • Cuttlebug Fancy Corners embossing folders, set of 4 (
  • Cuttlebug With Love Border embossing folders. set of 5 
  • Cuttlebug Just My Type Border embossing folders, set of 5 
  • Spellbinders small rubber sheet 
  • Red Liner Tape 
  • Fiskars Quarter Inch Hand Punch or Crop-a-Dile 
  • White Organza Ribbon, about 8”, tied in a bow.
Embossing Technique::
Embossing with the small Cuttlebug folders can be tricky. Using the regular sandwich (A, B, folder, B) may leave marks at the edges of the folder. We’ll use a special technique to avoid those marks. 
Cut a piece of the Spellbinders rubber sheet just a little smaller than the embossing folder. Then create the sandwich using the A and C plates as follows:  A plate, card-stock with the folder, raised side facing up, the piece of rubber sheet, and then the C plate. The rubber will apply pressure only at the center of the folder, so the edges won’t emboss lines.
When embossing multiple small folders, start at the center of the card-stock and work outward toward the edges. Roll the sandwich only just past the folder, and then back the sandwich out to avoid flattening parts you’ve already embossed. 
Create the Card
Card Exterior:
Using the Scor-Pal, score the 4 1/4” x 11” card at 5 1/2”. Crease to create the card. Set aside.
Emboss the swiss dot folder from the Just My Type embossing folder set in the center of the front panel, then the little floral line from the With Love embossing folder set to its left. Emboss either of the symmetric corner folders from the Fancy Corners set twice at the far right of the panel, once from the top and once from the bottom.
Using the Scor-Pal on the wrong side of the front panel, score lines at the edges of each of the embossed regions, and then randomly to form an attractive pattern.  
Affix the embossed panel to the card front.
Attach the bow to the front of the card using the glue of your choice. 
Card Interior:
Using the Scor-Pal, score the 4 1/4” x 5” piece of card stock, in landscape orientation, at 1/4”, 2 1/2”, and 4 3/4”. Mountain fold on each of the score lines, creasing well.
Place the gift card centered on the pup-up mechanism. Punch holes with the quarter-inch hole punch,  on the center crease of the mechanism, right next to the outside edges of the gift card, as shown. Cut a slit between the two punches.
Apply a strip of red liner tape to both of the quarter-inch flaps. Affix the inside panel inside the card using that red liner tape, putting the open end barely away from the fold of the card. 

Insert the gift card into the slot in the mechanism. 
                    

Tuesday, February 9, 2010

Changing Image Card


When the card is opened the image in the circle almost magically changes to a different image!
      * This card has been adapted from the Peek-a-boo card designed by Dawn Griffin

Materials

    Card-stock -
CoreDinations Super Assortment-Roy G Biv 12"x12"
       White
            8 1/2” x 9 3/4 (card back)
            8 1/2” x 5 1/2” (card front)
            5 1/4” x 2 3/4” (top layer)
       Black
            5 3/4” x 3 1/2” (layer)
            2 scraps, about 2” square each
            1/2” x 8 1/2” strip
       Yellow
            5 1/2” x 3” (layer)
            scrap, about 3” square
            1/8” x 8 1/2” strip

    Punches
       1 1/4” circle punch
       1 1/2” EK Success circe punch
       2” EK Success scallop circle punch

    Ultimate Gel Pens 

       White Pastel
       Black       

    Ribbon 

       4” of 1/2" wide black twill       

    Stamps 

       Heidi Swapp Clear Stamp
           Happy Birthday    
       DMD Clear Stamp sheet
           Light the Candles    
       My Sentiments Exactly
           "B" Sentiments    
       Matching Borders/Focals
           Happy/ Day    

    Ink 

       Versafine
           Onyx Black    
       Adirondack
           Lemonade    

    Adhesive of choice 


Instructions

    • Score the card back, in landscape orientation, at 3” and 6”. Score the card front in portrait orientation at 1 3/4”.

    • Z-fold the card back by valley folding at the 3" score line and mounain folding at the 6" line. Mountain fold the front on the score line. The card should be able to be aligned as shown in the diagram

      
    • Use the edge of the folded-back panel of the front of the card as a guide to punch a 1 1/4” circle in the card front. The hole should line up just to the left of the edge of the folded panel, and should be punched into the card as far as the punch will reach.


    • Align the right edges of the back and front of the card. Using a pencil or disappearing ink pen, trace the punched circle from the front of the card onto the front of the first layer of the card back.


    • Punch the 1 1/4” circle through both of the top two layers of the card back, carefully, punching out exactly over the circle traced from the card front.

    • Affix front panel of the card back to the back of card front, aligning the right edges. (Apply glue to the front of the first layer of the back of the card ONLY. Otherwise, the card will not work!)

    • Using a pencil or disappearing ink pen, lightly trace the circle onto the inside of the card back. Open the card. Lightly trace the circle onto the panel that slides into place.

    • Open the card to find the traced circles. Stamp images in the traced circles and color. If pencil was used to trace the circle, carefully erase the pencil.


    • Using the 1 1/4" and 1 1/2" circle punces, punch two rings out of black card stock scrap. Using the scalloped punch and the 1 1/4" punch, punch a scalloped ring out of yellow card stock. (To make a ring, always punch with the smaller punch first, then with the larger, punching with the first hole centered in the second punch.)

     • With a paper piercer and using a piece of plastic canvas as a guide, pierce a line of holes along the edge of the black layer. Draw lines between the holes with the white gel pen. Attach the black layer to the card front, centered at the top.


     • Stamp the white front layer with random swirls using the yellow ink. Stamp the “Happy”, “B”, and “Day” with black ink. Attach this panel to the yellow card layer then to the black card layer (the black layer is offset to the left, not centered.)

    • Attach the yellow scalloped ring to the card with the holes centered on the hole in the card front. Using the black gel pen, add a little dot to each of the scallops. Attach one black ring on top of the yellow one. Add drawn stitch lines to the black ring with the white gel pen. Draw little bows to finish the faux stitching.


    • Attach the other black ring to the inside front of the card. Add the black strip and then the yellow strip on the inside left of the card. Stamp the “Happy” and “Birthday” on the inside of the card using black ink.


    • Turn the card over to the back side. Open up the back of the card. Close to the fold, apply a narrow line of adhesive or glue.

    • Close the card and turn it back over. Attach the ribbon, which has been tied in a knot, to the card front.


    • The card is finished. Mail it in a standard A10 business envelope.

Wednesday, February 3, 2010

Explosion Card


Materials:

    • 4.25" x 5.5" piece of card-stock
    • 8.25" x 8.25" piece of text weight paper in same color as card-stock.
    • adhesive (glue, double sided tape, or a xyron)

Instructions:

     • Fold card-stock in half to form a standard sized card. Set aside.

     • Stamp the square of paper as desired. Valley fold square paper in half diagonally. Open.
      
     • Valley fold in half diagonally from opposite corners. Open.


     • There should now be an 'X' folded in the paper. Mountain fold the paper in half to form a rectangle. Open.
      

     • Fold on the diagonals again, collapsing the center fold, to the inside of the structure, forming a triangle (squash fold).


     • Fold the top layer's right corner to the center of the baseline.
             

     • Repeat with the top layer's left corner. Turn over and repeat.


     • Open and then collapse each of the little flaps just created into the center of the mechanism.
      
     • Glue the mechanism into the card so that the point just touches the fold.
      

     • Add glue to the top of the mechanism, then close the card so that both of the inside surfaces of the card are attached to the mechanism.

     • When the glue is dry, open the card to see the "explosion".
      

Magic No-lid Gift Box

Made from a single piece of card-stock, 
6 1/2” x 8 1/2”, this 2”x2”x2 1/2” box looks like it has a separate lid but the lid is really part of the box and appears almost magically!


Materials


White card-stock, 6 1/2 x 8 1/2”
Scor-Pal or other scoring tool
Hot Off the Press – Botanicals Stamps 

Vivid Inks - Ultramarine, Aqua, Shy Blue, Teal
Versamark Ink Pad
White Detail Embossing Powder
3” Round Hydra Sponge
Strong Double-sided Tape
About 18” Soft Blue Organza Ribbon 


Instructions
Prepare the Box Form
With the card-stock in the landscape orientation on the Scor-Pal, score at 2, 4, 6, and 8 inches.
Turn the card-stock to the portrait orientation. Score at 1, 2, 3, and 5 1/2 inches.
Fold on all score lines. Cut as shown in the figure; all solid lines are cut lines, while dotted lines are score/fold lines.


Decorate the Box

White emboss, using the Versamark ink and your choice of Botanical stamps, randomly on the portion of the box form that lies between the 3” and 5 1/2” score lines.
Sponge the various blue Vivid inks over the same region, covering all of the white card stock.
Use a tissue to wipe the ink off the embossed images.


Assemble the Box

First, valley fold the top one inch panel forward, covering the top half of the cut out triangles. Then mountain fold (away from you) on each of the vertical folds, forming a squared tube. Use strong double-sided tape on the 1/2” wide, 2 1/2” long tab to adhere the tab to the inside of the tube.
Next, fold the bottom panels in to create a bottom for the box. Use strong double-sided tape to adhere the two outermost panels to the two inner panels.

Carefully push down the top of the box. As you do the top will reveal itself. Once the top is all the way down onto the rest of the box, use strong double-sided tape to attach the small tab to the inside of the lid. Leave enough space when attaching the tab so that the “lid” to move easily up and down over the remainder of the box.


Use a small piece of red liner tape to attach the ribbon to the side of the lid, simply as decoration. Tie the ribbon into a bow.


Here is a PDF of instructions for this project. To save or print just select "Download" or "Print", below.

Monday, February 1, 2010

Pop-up Fairy Tale


There are three different pop-up elements on this card. Butterflies flutter on a paper spiral, a carriage pops to the foreground on a table mechanism, but the obvious star of the show is Rapunzel's cylindrical pop-up tower. The cylindrical pop-up mechanism is one that is seldom seen in pop-up books, but it is one that is dramatic, simple, and fun!

For the above card, in addition to the sturdy card-stock, you would need the following items which can be purchased at www.franticstamper.com:

          • Versafine Onyx Black
          • Memories Soft Baby Blue
          • Imaginisce Clear Stamp - Castle 
          • Imaginisce Clear Stamp - Carriage 
          • Imaginisce Clear Stamp-Flower 
          • Inkadinkado Clear Stamps - Best Friends 


For this tutorial, though, I will just show you how to make a generic cylindrical pop-up.

Materials:

     Sturdy folded card (the sturdier the better!)
     Sheet of medium weight cardstock
     Adhesive (glue, double sided tape, red-liner tape)

Pattern :

     The basic shape of the pattern follows.
     A few rules to remember:
        • The height of the mechanism should be equal to or less than the
           height of your folded card.
        • The width of the portion A of the pattern must be smaller than
           the width of your card (when folded).
        • The wider the portion A is, the broader the cylinder will be
        • The portion B must be longer than width A by about half the
           width of A
          (This can vary, depending on how much you want the
            cylinder to pop - experiment!).


Instructions:

     • Print out pattern. Cut on solid lines; mountain fold on dotted lines.

     • About an inch from the fold, on the right side of the inside of the card, and using strong glue, attach the folded flaps on the left edge of the mechanism.


     • Pass the long tab across the mechanism, and through the gap in the glued tabs.

     • With the mechanism flat on the back of the card, bend the tab back across the mechanism.

     • Add glue or double sided tape to the edge of the tab, then close the card.


     • Wait for the glue to dry completely, then open the card. VOILA! Up pops the cylinder!


Of course, it helps to stamp the card and the mechanism BEFORE final assembly. The BACK of the tab should be stamped to blend into the background of the card, while the front of the main mechanism should be stamped appropriately to the cylindrical object it will become.

Think of all the possibilities; castle towers, rocket ships, wishing wells, drinking glasses, baskets, and vases. Have fun experimenting with the pop-up cylinder!

Friday, January 29, 2010

Pop-up Gift Box Card:


Materials:

8 1/2" x 11" sheet of card stock
scrap of coordinating cardstock for box lid lip
red liner tape and other adhesive


Pattern (click to enlarge):


Instructions:
The pattern should be printed on sturdy cardstock.
Cut out the pattern on solid lines. Score along dotted lines.

Stamp the inside image below the score line on the inside panel.


Mountain fold both the inside and back panels on the score lines.


Draw a line down the front of the front panel to form the box's corner.
Attach the front of the card with thin red-liner tape or strong glue along the left, right, and bottom edges.


Attach lid to the trapezoid of inside panel that lies between the top edge and the fold line.


Using the other adhesive, adhere the lid lip to the lid. Embellish the package with ribbons, bows, gift tags, etc.