Santa Card
This card was inspired by a couple of cards I saw on-line, but I added my own twist to them, using the Divine Swirls embossing folder and a corner rounder, and adding a hat completed with a pompom.
Materials
- Paper and Cardstock
- White Card-stock
- 4 1/4" x 11" for card base
- 4 1/4 x 5 1/2 for beard, moustache, and hat brim
- Small scrap for eyes
- Black Card-stock, small scrap for eyes
- Bazzill Singles
- Sweet Pea, 4 1/4" x 1 13/16", plus a small scrap for the nose
- Diablo, 4 1/4" x 1 13/16", and 3 3/4" x 1 5/8" then cut on the diagonal to form a triangle.
- Inks and Embossing Powders
- Distress Inks
- Tattered Rose
- Weathered Wood
- Embellishments
- Tools
- Provo Craft Cuttlebug Machine
- Provo Craft Cuttlebug A2 Embossing Folder, Divine Swirl
- Crop-A-Dile Corner Chomper, corner rounder
- Punches
- EK Success Nesting Punches, 1 1/2" x 3/4" Oval
- EK Success Circle, 5/16"
- EK Success Circle, 1/2"
- EK Success Circle, 1"
- Fiskars Decorative Edge Scissors, Cloud
- Ultimate Gel Pen, White Pastel
- 3" round hydra sponge
- Adhesives
- Aleene's Tacky Glue
- ATG-714 Double Sided Adhesive Tape Gun for 1/4" tape, with tape
- 3-D Large Circle Foam Dots
- Other
Instructions
- Make the eyes.
- Punch two 1/2" circles out of black card-stock.
- Punch two 3/8" circles out of black card stock.
- Punch two 3/8" circles out of white card stock.
- Layer a white circle centered on each of the 1/2" black circles
- Layer a small black circle over the white circle, offset so a crescent of the white circle is visible, on each eye.
- Opposite from the white crescent, draw a small arc of white with the white gel pen, on each eye.
- Set eyes aside.


- Punch a 1" circle out of the scrap of Sweet Pea card-stock for the nose. Sponge rose distress ink around the edges.
- Sponge two circles of rose distress ink onto the rectangle of Sweet Pea card-stock, about an inch from the center horizontally, and just below center vertically. These will be Santa's rosy cheeks.
- Attach the Diablo rectangle to the front of the card base right at the top of the card.
- Attach the Sweet Pea card-stock rectangle to the front of the card base, just below the diablo rectangle.

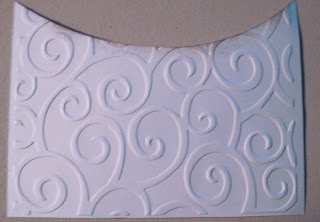
- Run the quarter sheet of white card-stock through the CuttleBug, inside of the Divine Swirls embossing folder, according to manufacturer's directions.
- Cut the embossed paper into two pieces, 4 1/4" x 4 1/4" square and 2 1/4" a 4 1/4 ".
- Use the Cloud scissors on the 2 1/4" x 4 1/4" piece of embossed card-stock to create a band for Santa's Hat, roughly 1/2" wide or a little wider.
Sponge the edges of the band with Weathered Wood ink.
Attach to the card, slightly overlapping the Sweet Pea Rectangle.

- Use the beard template to cut the square piece of embossed card-stock to make Santa's beard.
Sponge around the edges of the cut arch with the Weathered Wood ink.

- Use the remaining scrap from the beard to punch the two ovals for Santa's moustache.
Sponge around the ovals with the Weathered Wood ink.
- Attach the beard at the bottom of the card, with the top of the beard barely overlapping the Sweet Pea strip.
- Sponge the hypotenuse (the slanted side) of the Diable triangle with Weathered Wood ink. Here are the parts that have been sponged so far, excluding the beard.

- Attach the triangle of Diablo card-stock to the top left side of the card, point down.
- Corner round all of the corners of the card using the 1/2" side of the Corner Chompers.

- Sponge Weathered Wood ink around all of the card edges.
- Attach Santa's nose to the lower center of the Sweet Pea part of the card front, just above the beard, using a 3-D foam dot.
Attach the ovals below the nose to make the moustache.
Attach the eyes above and to each side of the nose.
- Attach a pom pom to the end of the triangle to finish Santa's hat.

- On the inside, stamp a sentiment of your choice. My favorite is a simple "Ho Ho Ho."


I am so overwhelmed with your work I love it.
ReplyDeleteI am having a my birthday blog hop. I was wondering if you would like to be in it with us.
Thank Debbie
Way to cute card. I love how you did the eyes. You have wonderful instructions.
ReplyDeleteI am looking forward to being in the Birthday Blog Hop for Debbie. I a sure we are going to have a ton of fun.
TFS!
Cindy
http://scrappinc.blogspot.com
OMG he is just too cute. I am blog hopping and you were next on the list. Thanks for sharing.
ReplyDeleteMindy - The Determined Scrapper
http://thedeterminedscrapper.blogspot.com
I really like the simplicity of this card. I will definately try to do this. thx
ReplyDeleteI love this Birthday album. What a unique idea.. I am a new follower and cannot wait to see more.
ReplyDelete