Monday, January 24, 2011

Double CD Fold-out Album


Double Fold-out CD Folder Album

A few weeks back I saw a double fold-out CD folder album project kit and instructions by Patty Bennet . I fell in love with the project, and thought it would be the perfect way to deliver my Christmas gifts to my mom and dad (who live 3000 miles from me). I ordered the on-line instructions, and set to work to make the album. It was a great success, in spite of the fact that I sometimes struggled with the instructions.

The struggles I had led me to look at the project differently, and to rework the project from the bottom up. What follows are my version of the fold-out album, with my own measurements, patterns, and instructions. I hope you will enjoy them, and find them easy to follow.

*Warning - this is not a quick project, but it isn't really difficult, either; it is just a bit time consuming. The recipient of this album will be sure to appreciate your time and effort, though, since it is a stunning beauty!

Materials

  • Paper and Cardstock
    • Bazzill 12"x12" Cardstock, Heather, 3 sheets
    • Little Yellow Bicycle, Clothesline 12"x12" Cardstock, Cornflower/Cornflower Ledger, 2 sheets
    • Creative Imaginations,Mon Ami collection, Bell Raie, 3 sheets
    • #5 Manila Shipping Tags, 4-3/4" x 2-3/8",24/package, 8 tags
    • CD Media folders, 4 folders
  • Stamps
    • Penny Black clear stamps, Allegro
    • Prima clear stamps, Vintage Script
    • Stampendous Clear Stamps, Hot Rocketz
  • Inks and Embossing Powders
    • Distress Ink Pad, Dusty Concord
  • Embellishments
    • K&Co Cottage Garden dimensional stickers
    • Medium Eyelets, Vanilla, 8 eyelets
    • Organza Ribbon, 1/4", white, about 2 yards
  • Tools
    • Spellbinders Nestabilities Die Labels #1
    • Provo Craft Cuttlebug Machine
    • The Scor-Pal
    • Fiskars 12" Deluxe Portable Paper Trimmer
    • Crop-A-Dile
    • 3" round Hydra Sponge
  • Adhesives
    • Wonder Tape, 1/4"
    • Foam dots or tape
    • Glue stick
  • Other
    • 8 Birthday sayings, typed and printed. (The ones I used are available here .)

Instructions

  • Cut and score two of the pieces of 12"x12" Bazzill cardstock as follows (number them on their wrong side as follows:
    • 5 1/4" x 12", scored in landscape orientation at 5 1/4", 6", and 11 1/4" (back and inside cover)
    • 5 1/4" x 12", scored in landscape orientation at 3/8", 3/4", 6", 11 1/4", and 11 5/8" (insert)
    • 5 1/4" x 11 1/4", scored in landscape orientation at 3/4" and 6" (front cover)
    • Two pieces, each 5 1/4" square (insides of back and inside covers)
    • 5 1/4" x 3/4" (this is the size of the scrap left after cutting the third piece, and will be used to cover the inside of the left spine)
    •      
  • With the wrong side up, valley fold the first and third pieces.
    The third piece will form the front cover; the first will form the rear and inside covers.


  • With glue stick or other adhesive, glue the right-most panel of the third piece to the middle panel of the same piece, reinforcing the panel.


  • Place strong tape along the inside of the 3/4" panel of the third piece.
    Affix the 3/4" panel to the outside of the left-most 3/4" panel of the first piece, forming the cover.


  • With the right side up on the second piece, Valley fold the first, second, fourth and fifth scores (the ones on the edges).
    Mountain fold the score in the center.


  • Turning the second piece over so the wrong side is up, place glue on the middle two panels, and adhere them to each other.
    This will be the central insert, dividing the two fold out CD panels.
  • Apply strong adhesive tape to the wrong sides of each of the four 3/8" wide panels at the end of the central insert.
    Carefully insert into the 3/4" panel of the cover (not the one that was formed by putting the two cover pieces together, but the one that was formed by scoring the first piece).
    Be careful that the folds in the insert align with the folds in the cover.


  • Glue the two 5 1/4" square panels to the right-most and center panels of the cover, right side up, reinforcing each panel.
    Glue the 3/4" x 5 1/4" panel over the left 3/4" panel so that both the inside and outside of the cover has the right-side of the cardstock showing.


  • The cover is completed; set aside.


  • Fold each of the 4 CD folders so that the CD holders are to the inside, and inside pockets are all facing up.
  • Glue two of the folders together so that they form a "Z".


    Repeat with the other two folders but so that they form a reversed "Z".
  • Using the strong tape, glue the accordion CD units to the right-most and center panels of the cover, with the insert panel between them.


  • Cut the patterned papers into 5"x5" pieces, reserving scraps for the tags, if desired. You will need 10 of the squares.
  • Cover each of the exposed CD panels with the patterned paper, mixing the papers as desired.
    • To cover the panels with the circular punchout, first insert the paper into the holder (right side up), and mark the punchout with a pencil or disappearing ink pen.
      Remove the paper from the holder, and use the 3/4" circle punch to punch the marked partial circle.


      Glue the panel into place.
    • To cover the panels with the cut slot, first insert the paper into the holder (right side up), mark the edge of the slot with a pencil or disappearing ink pen.


      Remove the paper from the holder, and carefully cut along the drawn line.
      Glue each of the two pieces into place.
  • Attach a 24" piece of ribbon to the outside of the front cover, so that the ribbon will extend around the book and be able to be tied in a bow to the right side of the front of the cover.
  • Using a piece of the 3rd piece of Bazzill, die cut the largest of the labels 1 dies.
    Sponge around the piece with the dusty concord ink.
    Attach it to the front cover, over the ribbon, using foam dots or foam tape.
  • Decorate the label panel with the dimensional stickers as desired.
  • Cut a small tag out of the Bazzil Scraps.
    Stamp the "Happy Birthday" from the on it with the concord ink.
    Punch a small hole using the Crop-a-Dile.
    Attach a small piece of ribbon through the hole.
    Attach the tag to the dimensional stickers decoration on the front panel.


  • The album is completed. Set aside.
  • Cover the front of eight tags with the patterned paper or Bazzill paper as desired.
  • For each tag, where the hole in the tag is, punch a hole through the cover paper with the Crop-a-Dile.
    Attach an eyelet through the hole.
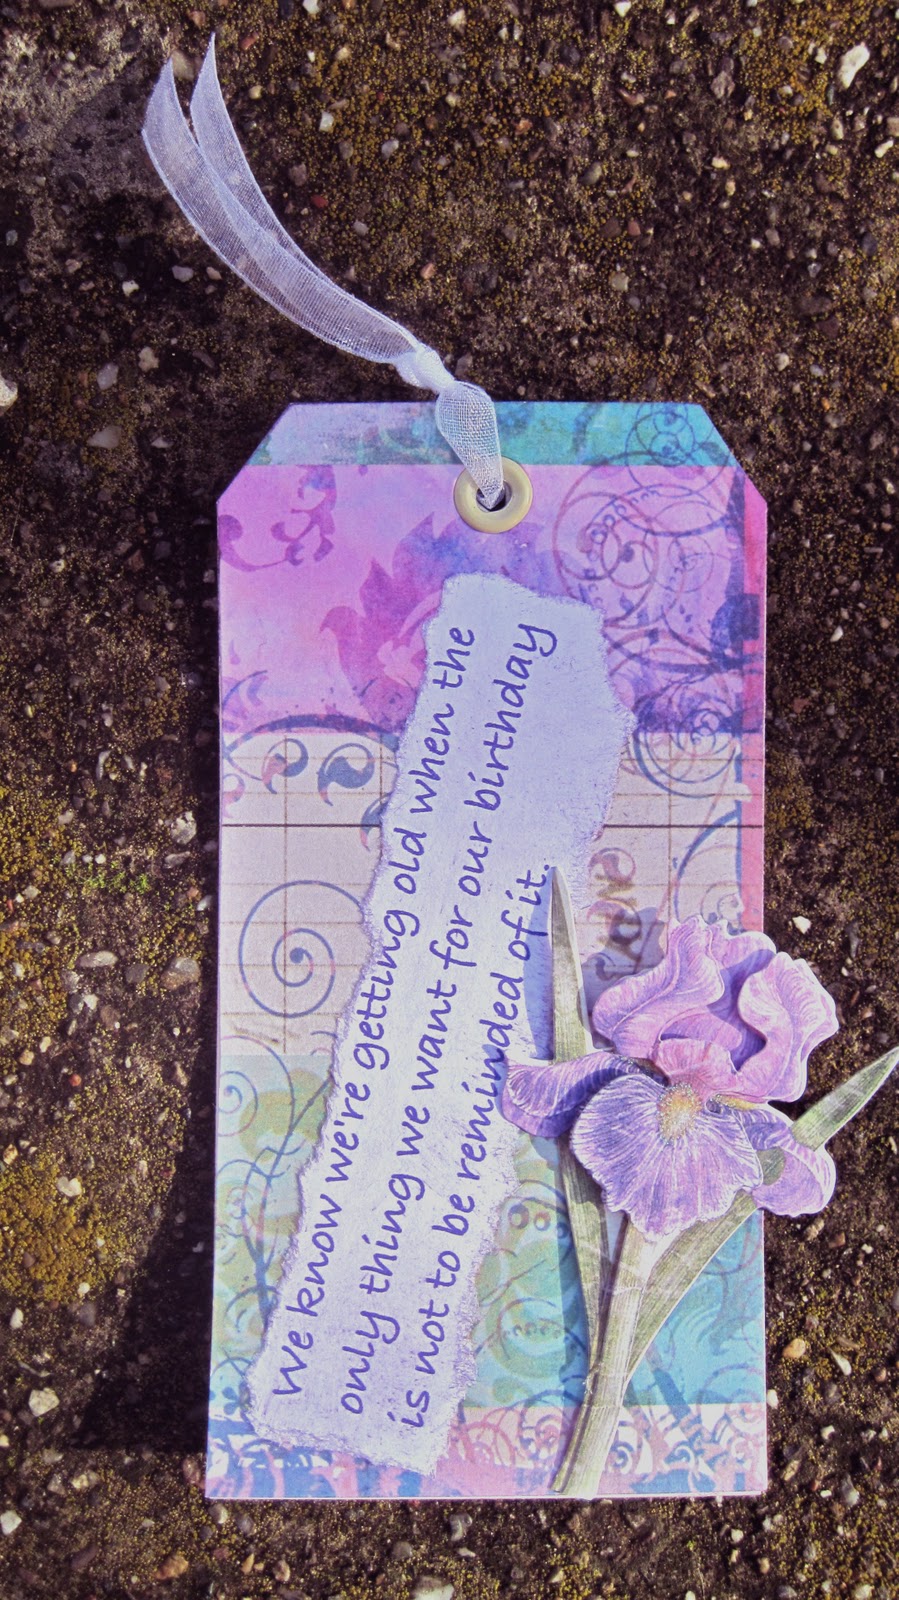
    Tie a length of ribbon through the eyelet.
  • Randomly stamp the tags with the iris stamp or with the script stamp as desired.
  • Tear around the birthday sayings.
    Glue a saying to the front of each tag.
    Lightly sponge ink around the edges of the sayings.
  • Embellish the tag with dimensional stickers as desired.


  • Place a tag in each of the eight pockets in the CD Album.
    Tie the album closed.

Here are some more photos of the various pages of the album, with their tags inside.


I hope you have enjoyed this project and will give it a try. It is really worth the effort!

Smiles,
Kathy

Friday, January 14, 2011

Automatic-pop-up birthday card


Birthday Surprise

The surprise is that this card will pop open on its own when the card is removed from its envelope.

Materials

  • Paper and Cardstock
    • 2 pieces of sturdy white cardstock, each 4 1/4" x 5 1/2"
    • 4 scraps of sturdy white cardstock, each 2" x 3/4"
  • Stamps
    • Inkadinkadoo Clear Stamps, Birthday Fun
  • Inks and Embossing Powders
    • Versafine Ink Pad, Onyx Black
    • Palette Hybrid Ink Pad, Belle Rose
  • Tools
    • EK Success Large Punch, 2" Scalloped Circle
    • Original PINK Crop-A-Dile
    • Crop-A-Dile Corner Chomper, 1/4" and 1/2" Corner Rounder
    • The Scor-Pal
    • Hydra Sponge
    • ATG-714 Double Sided Adhesive Tape Gun
    • Colored Pencils, Pink, Bright Pink, and Yellow
  • Adhesives
    • Red Liner tape, 1/8" width
    • Double Sided Refill for ATG-714, 1/4"
  • Rubber band, about 2 1/2" across

Instructions

  • In landscape orientation, score each of the two 4 1/4" x 5 1/2" pieces at 1/2", 1", 4 1/2" and 5".
  • Punch a scalloped hole horizontally centered on one of the two pieces, closer to the top edge than to the bottom.
    Reserve the punched out piece.


  • Line the front of the card up with the card back.
    With a pencil, lightly trace the scallop hole onto the inside of the card back.
    Using the pencil tracing as a guide, and using the black versafine ink, stamp the cupcake.
    Color the cupcake with colored pencils.


  • Cover the cupcake with the reserved punch out.
    Using the pink ink and the hydra sponge, sponge all around the punched shape.
    Discard the punched shape.
  • With pink ink, stamp "Happy Birthday" on the lower part of the front of the card.
    Also with the pink ink, stamp the confetti repeatedly on the top portion of the front of the card, stamping off the top and over the edge of the punched hole.
  • Fold the card back so that the folds at 1/2" and 5 " are mountain folds, and the ones at 1" and 4 1/2" are valley folds.
    Fold the card front so that the folds at 1/2" and 5" are valley folds, and the ones at 1" and 4 1/2" are mountain folds.


  • Add strips of red liner tape to the edges of the 1/2" wide panels at the left and right edges of the card back.


    Set aside.
  • Round corners on one end of each of the small strips of card stock using the corner chompers.


  • Stack the four strips of card stock.
    Use the small hole punch of the Crop-a-Dile to punch a small hole in the rounded end of the stack of strips.


  • With the strips still stacked, make a diagonal cut from one edge of the strip to the punched hole.


  • With the slit at the top of one of the strips, insert the rubber band through the slit and into the hole.


  • With the slit at the bottom of a second strip, insert the rubber band through the slit, into the hole.


    Glue the two strips together using the ATG adhesive gun.
  • Repeat the previous two steps with the other two strips.
  • Remove the red liner from the strips on the right side of the card back.
    Affix one of the tabs produced by the strips to the tape about 1" from the bottom of the card, and with the hole near the fold.
    The edge of the tab should extend to the right, beyond the edge of the card. It will be trimmed later.
    Apply a piece of red liner tape over the tab.


  • Affix the right side of the card front to the right side of the card back, carefully aligning edges.
  • Repeat with the left side of the card back and the other tab, adjusting the position of the tab so that the rubber band is not stretched, but is taught.


  • Trim off the extended ends of the tabs flush with the card edges.


  • The finished card will pull flat for insertion into an envelope, but when removed from the envelope it will pop itself back to this diaorama shape.


I hope you will give this card a try. It is a lot easier than you might think, and it is a lot of fun!

See you next time.

Tuesday, December 28, 2010

Santa Card


Santa Card

This card was inspired by a couple of cards I saw on-line, but I added my own twist to them, using the Divine Swirls embossing folder and a corner rounder, and adding a hat completed with a pompom.

Materials

  • Paper and Cardstock
    • White Card-stock
      • 4 1/4" x 11" for card base
      • 4 1/4 x 5 1/2 for beard, moustache, and hat brim
      • Small scrap for eyes
    • Black Card-stock, small scrap for eyes
    • Bazzill Singles
      • Sweet Pea,   4 1/4" x 1 13/16", plus a small scrap for the nose
      • Diablo,   4 1/4" x 1 13/16", and 3 3/4" x 1 5/8" then cut on the diagonal to form a triangle.
  • Inks and Embossing Powders
    • Distress Inks
      • Tattered Rose
      • Weathered Wood
  • Embellishments
    • Small white pom pom
  • Tools
    • Provo Craft Cuttlebug Machine
    • Provo Craft Cuttlebug A2 Embossing Folder, Divine Swirl
    • Crop-A-Dile Corner Chomper, corner rounder
    • Punches
      • EK Success Nesting Punches, 1 1/2" x 3/4" Oval
      • EK Success Circle, 5/16"
      • EK Success Circle, 1/2"
      • EK Success Circle, 1"
    • Fiskars Decorative Edge Scissors, Cloud
    • Ultimate Gel Pen, White Pastel
    • 3" round hydra sponge
  • Adhesives
    • Aleene's Tacky Glue
    • ATG-714 Double Sided Adhesive Tape Gun for 1/4" tape, with tape
    • 3-D Large Circle Foam Dots
  • Other

Instructions

  • Make the eyes.
    • Punch two 1/2" circles out of black card-stock.
    • Punch two 3/8" circles out of black card stock.
    • Punch two 3/8" circles out of white card stock.
    • Layer a white circle centered on each of the 1/2" black circles
    • Layer a small black circle over the white circle, offset so a crescent of the white circle is visible, on each eye.
    • Opposite from the white crescent, draw a small arc of white with the white gel pen, on each eye.
    • Set eyes aside.
    •      
  • Punch a 1" circle out of the scrap of Sweet Pea card-stock for the nose. Sponge rose distress ink around the edges.
  • Sponge two circles of rose distress ink onto the rectangle of Sweet Pea card-stock, about an inch from the center horizontally, and just below center vertically. These will be Santa's rosy cheeks.
  • Attach the Diablo rectangle to the front of the card base right at the top of the card.
  • Attach the Sweet Pea card-stock rectangle to the front of the card base, just below the diablo rectangle.
  • Run the quarter sheet of white card-stock through the CuttleBug, inside of the Divine Swirls embossing folder, according to manufacturer's directions.
  • Cut the embossed paper into two pieces, 4 1/4" x 4 1/4" square and 2 1/4" a 4 1/4 ".
  • Use the Cloud scissors on the 2 1/4" x 4 1/4" piece of embossed card-stock to create a band for Santa's Hat, roughly 1/2" wide or a little wider.
    Sponge the edges of the band with Weathered Wood ink.
    Attach to the card, slightly overlapping the Sweet Pea Rectangle.
  • Use the beard template to cut the square piece of embossed card-stock to make Santa's beard.
    Sponge around the edges of the cut arch with the Weathered Wood ink.
  • Use the remaining scrap from the beard to punch the two ovals for Santa's moustache.
    Sponge around the ovals with the Weathered Wood ink.
  • Attach the beard at the bottom of the card, with the top of the beard barely overlapping the Sweet Pea strip.
  • Sponge the hypotenuse (the slanted side) of the Diable triangle with Weathered Wood ink. Here are the parts that have been sponged so far, excluding the beard.
  • Attach the triangle of Diablo card-stock to the top left side of the card, point down.
  • Corner round all of the corners of the card using the 1/2" side of the Corner Chompers.
  • Sponge Weathered Wood ink around all of the card edges.
  • Attach Santa's nose to the lower center of the Sweet Pea part of the card front, just above the beard, using a 3-D foam dot.
    Attach the ovals below the nose to make the moustache.
    Attach the eyes above and to each side of the nose.
  • Attach a pom pom to the end of the triangle to finish Santa's hat.
  • On the inside, stamp a sentiment of your choice. My favorite is a simple "Ho Ho Ho."

Thanksgiving Placecard


Thanksgiving Place Card

Materials

  • Paper and Cardstock
    • White Card-stock, 2 1/2"x 5", folded to make 2 1//2" square card and small scrap for name plate base.
    • Bazzill Basics Monochromatic 5-color packs, Oranges
      • Cantelope, 2 1/8" x 2 1/8" square, plus a small scrap for flower
      • Apricot, 2 3/8" x 2 3/8" plus a small scrap for flower and for name plate
  • Stamps
    • Mini Clear Stamps from Imaginisce, Snag'em stamps, Apple Cider
    • Stampendous Clear Stamps, Notes for a Friend, "Thanks"
  • Inks and Embossing Powders
    • Memories Dye ink pads, Artprint Brown
  • Embellishments
    • Doodlebug Mini Brads, Buttercream
  • Tools
    • Crop-A-Dile Corner Chomper, Deco/stub
    • EK Mini Punch Set, Daisy and Petunia
    • Dual Tip Stylus with wood handle
    • Ultimate Gel Pen, Bronze
    • A push pin
  • Adhesives
    • 3D Micro Square Foam Dots
    • Glue Dots, Mini Size

Instructions

  • Stamp the Leaves and the "thanks" with artprint brown ink on the cantelope square.
  • Punch the corners of the cantelope square with the Stub side of the Corner Chomper.
  • Layer onto the apricot square, and then onto the white card.
  • Punch one petunia and one daisy out of the apricot scrap, and one daisy out of the cantelope.
  • Using the embossing stylus and a soft surface like a mouse pad, press down the centers of the flowers, curving the petals upward.
  • Use the push pin to poke a small hole in the center of each of the flowers.
  • Stack the flowers with the petunia on the bottom and the apricot daisy on the top.
  • Put the brad through the holes in the flowers. Trim off the ends of the brad stems if necessary
  • Pull the petals of the two daisies up around the brad.
  • Use a glue dot to attach the flower to the lower left corner of the cantelope layer.
  • Trim a scrap of cantelope to 7/8" x 1/4".
  • Use the bronze gel pen to write the name of the guest on the small rectangle of cantelope scrap.
  • Mount the cantelope piece onto the white scrap and trim to 1/8" inch around the cantelope scrap.
  • Mount the name plate to the card using foam squares.

Noel Accordion Tag

<

NOEL Pop-Up Accordion Tag

Materials

  • Paper and Cardstock
    • Foil Coated shiny metallic foil card-stock, Gold
    • Foil Coated shiny metallic foil card-stock, Green
    • Basic Grey Jovial Collection pack, Nice, Scarf, Nipping, Winter Garden
    • Fancy Pants Rusted Sun, Pool Party
    • #8 Manila "Gang of 4" Accordion Fold Tags
    • #3 Manila Shipping Tags
    • Piece of light-weight typing bond, cut into three 2"x 5" strips, glued to the seams of the tags
    • White card stock scraps
  • Stamps
    • Hot Off the Press Mini Ornaments or similar mini-ornament
    • Inkadinkado Clear stamp, Santa/Elf or similar Santa stamp
  • Inks and Embossing Powders
    • Memories Hunter Green
    • Memories Art Print Brown
    • Memories Cherry Red
    • Memories Sky
    • Versafine, Onyx Black
  • Embellishments
    • 1/4" Silk Ribbon, Red
    • Art Institute Ultra-fine Glitter, True Red
    • Martha Stewart Flocking, Swan White
    • Aleene's True Snow craft paste
    • Embroidered letters from fabric store, N, O, E, and L
  • Tools
    • Martha Stewart Crafts Punch, Branch
    • EK Success Large Punch, Leaping Deer
    • EK Success 1 3/8" circle punch
    • EK Success 1" circle punch
    • Fiskar's 1/8" circle hand punch
  • Adhesives
    • Aleene's Thick Designer Tacky Glue
  • Other
    • Standard Brass Office Brad
    • 4 gummed hole reinforcers

Information

  • The accordion tags are attached to each other only at the top and bottom edges. To reinforce them, I added a narrow panel of typing bond over the seam between the tags prior to covering the tags with designer papers.
  • To put the holes back in the tags after covering the tags with paper, I punched them from the back side so I could align my holes with the original ones. I added gummed hole reinforcers to the front to highlight and protect the holes I had just punched.
  • The little tag on the far left panel slides up inside the chimney to reveal a stamped and flocked Santa Claus. The tag slides on a cut slit in a hidden panel under the visible chimney so that the tag pulls straight up and can't be completely removed from the chimney.
  • The pop-up gifts are simple to make. Start with a strip of cardstock as wide as you want the box to be high, and 4 times as long as you want the gift to be wide, plus a quarter of an inch. (For example, if you want a box that is 1 inch wide and 2 inches high, start with a strip that is 2 inches wide and 4 1/4 inch long.) On the right side of the cardstock, score the strip at the width increments across the length of the strip. (In our example, that would mean scores at 1, 2, 3, and 4 inches.) Mountain fold the strip at the score lines, and use adhesive to attach the 1/4" tab to the first panel of the strip, to form an open box. Glue the open box into a valley fold of the card or tag using a strong adhesive, making sure a corner of the box fits tightly into the fold. Add ribbons and bows as shown in the photo
  • The tree garland at the top of the center panels was formed by gluing a strip of cardstock across the top of the panels. The strip is the exact length needed to stop the card from opening further than to a 90° angle so that the gift boxes beneath it are popped open to their perfect positions. The strip is folded in the center so it folds to the inside the tags when closed. The strip is covered with punched out tree branches for camoflauge and decoration. The little stamped and cut out ornaments were hung from the branches, attached with glue only at their tops so they will dangle.
  • The reindeer "leaps" over the trees in the final panel of the tag on a circle attached to the tag with a brass tab. The circle has a tab attached to it as a handle to spin the disc, and is prevented from moving too far by a "stop" (a foam dot that gets in the way of further motion.)

Three Tags of Joy

by Kathy Berger


Joy Tiny Tags

Materials

  • Paper and Cardstock
    • Midnight Frost Crystals Double Sided Paper     ( BBP-P-03395   $0.89)
    • Small scrap of Bazzill, Oslo   ( BAZ-7-7126   $0.59)
  • Stamps
    • Tween Alpha by Peter Horjus Clear Stamps     ( AL-CSE-3209   $24.99 - December Sale: $18.74)
  • Inks and Embossing Powders
  • Embellishments
    • Blue Ribbons     ( of choice prices vary), about 24 inches total
    • Rhinestone snowflake, substitute Basic Grey Bling It Snowflake, Powder     ( BG-BI-2097   $1.99
    • clear snowflake buttons
  • Tools
    • Fiskars 1/4" circle hand punch     ( FIK-hnd-1/4   $6.95)
    • Fiskars 1/8" circle hand punch     ( FIK-hnd-1/8   $6.95)
    • EK Success Whale of a Punch, Tag     ( EK-PSPWP-13 $13.99)
    • EK Success Whale of a Punch, Scalloped Tag     ( EK-RSNAPS001   $13.99)
    • EK Success Rounded Tag punch, Substitute Deckle Tag     ( EK-PSPWP-20   $13.99)
    • The Scor-Pal     ( Scor-Pal   $39.99)

TIP:

To string ribbon through a small hole, use a floss threader intended for threading dental floss around braces. Pass the tip through the hole in the paper, and the ribbon through the loop in the flosser. Pull the flosser through the hole and the ribbon will follow.