Monday, June 22, 2009

Happy Independence Day card

This complicated-looking card is actually quite simple to make. It is a tri-shutter card (Thanks, Bonnie)


Materials:
     • Neutral colored card-stock 
 5 1/2” x 12”
     • Decorative paper or light card-stock (red, white, blue) 
 5 1/4 x 10”
     • Punched stars or other decorative elements
     • Small ribbon bow to coordinate with decorative paper
     • Stamp with patriotic saying.
     • Fireworks stamp (optional)
     • Dark blue ink pad
     • Marker in coordinating color (optional)
     • Fiskars cutting tool or ruler and cutting knife
     • Adhesive of choice

Instructions
     • Use the following cutting guide to cut the decorative card-stock for the decorative layer.


     • On the large neutral card stock in the portrait orientation, make a long slit starting at 2” and extending to 10” at 1 1/2” from each of the two edges.


     • In landscape orientation, score from the top edge to the top slit at 2” and 10”. Repeat from the bottom slit to the bottom edge. Score from top edge to bottom edge at 4” and 8”.

     • On the front of the card mountain fold at the first three score lines from top to bottom. Valley fold at the next set of score lines, then Mountain, etc. all the way across the card. The top and bottom portions of the card will have four folds total, while the center portion will have two.


     • Glue one of the “T” decorative panels to the front of the card. Glue the other to the front (inside) of the back panel of the card. Glue one of the smallest decorative panels to each of the smallest panels. Glue one of the long, thin decorative panels to the long panels on the top and bottom of the card.

     • Stamp the saying on the larger central area of the card to which no decorative panel has been affixed using blue ink. Randomly stamp the fireworks stamp all over the card, as desired.

     • Decorate the front of the card with stars or other embellishments. Allow some of the items to extend beyond the front panel, but take care that the adhesive is only on the portions to be affixed to the front panel.

     • Add a bow to finish the card.


     • The finished folded card size is 4” x 5 1/2”, which will fit into a standard A2 envelope.

Thursday, June 4, 2009

Penny Spinner Card

     I have always loved paper engineered books and cards. There is nothing that makes me feel more like a child than the surprise of opening a page and having things popup or spin. I love being able to lift flaps or pull levers and have magical things happen as a result.

     It seems natural, then, that I would love to make cards that "do something." This passion has led me to search high and low for ideas for interactive cards, and to adapt techniques used by paper engineers to card making.

     One of my favorite simple interactive cards is a penny spinner card.


Materials:
     • 5 1/2” x 4 1/4” Standard card
     • 5” x 3 3/4” rectangle of black card-stock
     • 3 1/2” x 4 3/4” rectangle of black and white, decorative paper
     • 2” x 2” square of white card-stock
     • 2 1/4” x 2 1/4” square of black card-stock
     • Scrap of heavy white card-stock for spinner.
     • Small saying stamp, about 1 3/4” square
     • Small Flower stamp, about 1” in diameter
     • Tiny word stamp
     • Black ink
     • Black marker
     • 10 round pop-dots, 1/4” diameter, 1/8” thick.
     • 2 pennies (Nickels will also work.)
     • Adhesive
     • Ruler
     • Craft knife:

Instructions:

     • Stamp the saying stamp in center of 2”x2” square. Affix to the black 2 1/4” square. Set aside.
     • Stamp the flower stamp on the heavy card stock scrap. Cut out and set aside.
     • Glue the striped decorative paper to the rectangular piece of black card-stock.
     • Turn the black rectangle of card-stock over and mark a rectangle, 1/2” up from the bottom, 1/2” from each side, and 3/8” high


     • Cut a slot by cutting along each of the edges of the marked rectangle.
     • Place this panel with the slot centered onto the front of the card.


     • With a pencil, lightly trace the rectangular slot onto the card front. In the rectangle you’ve drawn.

     • Stamp a word stamp repeatedly, then, using the black marker, scribble a pattern just barely extending past the pencil lines.


     •Carefully erase the pencil marks.

     •Attach a pop dot to the center of a penny.


     •Place the penny under the card stock with the slot, so that the pop dot is within the slot.


     • Remove the paper from the pop dot, and then carefully line up the second penny over the first penny, making a penny sandwich, with the pennies on either side of the card-stock.


     • Add pop dots to the back of the card-stock in each of the corners, in the center of each of the long sides, and centered between these to support the middle of the card.


     • Peel off the paper from the dots and flip the card stock over. Place centered on the card and press down firmly.


     • Attach the Spinner to the top penny with a pop dot. Add the stamped square with standard adhesive.


     Here are a couple more examples of simple spinner cards.


Sunday, May 31, 2009

Graduation Cap and Gown

My daughter graduates from high school on June 12th (2009). I have been working on a special card for her (more of a memory book, actually, containing her school pictures since kindergarten), and wanted to have something special for the front of the card. I decided to make a graduation cap and gown to match the one she'll be wearing. Here's how I did it.

I started with a piece of yellow light-weight card stock 2 1/4" long by 3 3/4" wide. In landscape orientation I scored the card at 1/4", 1/2", 1", 1 1/4", 1 3/4", 2", 2 1/2", 2 3/4", and 3 1/4", as shown.


Put a line of adhesive across the top edge. Mountain fold the first two scores, and then accordion fold across the rest of the piece.

Take a 1 1/2" x 1 1/4" piece of the same yellow card stock. In portrait orientation score at 3/4". Lightly fold the paper in half across the score (do not crease). Cut a small "v" shape out of the front of the piece by cutting at the score line for about 1/4", and then from the fold, about 1/4" down, diagonally to the end of the first cut.

The result of these first few steps should be like this:


Glue the pleated piece inside the bodice piece using a very strong glue or tape.


Finally, to make sleeves for the gown, score a piece of card stock 4"x 1", in portrait orientation, at 1/2". Fold on the score line. Glue down. Glue centered to the back of the rest of the gown. Fold the sleeves at a angle at the shoulders of the gown, inward to the center line of the gown. Use a glue dot to affix the cuff end of the sleeve into place.

To make the cap start with a 1 1/2" x 1" piece of yellow card stock. Find the center of each edge. Cut diagonally from center point to center point of each edge to form a diamond. Using a heart punch and a scrap of yellow card stock about 1" wide, punch as shown. The piece that will be used is the one on the right.


Make a little tassel by raveling some ribbon or buy bundling some thread. Glue that to a piece of cord. Punch a small hole in the center of the diamond, pass the end of the cord through the hole and affix to the back. Insert a small brad through the hole. Glue the head piece to the mortar board.

Here's the finished project, with a couple of honors cords thrown in (yup... my kid is an honor student who also earned a service award!):

Saturday, May 30, 2009

Father's Day card

I wanted to have a special card for my dad for Father's Day. I wanted it to be similar to the one I'd made for mom on Mother's Day (a variation of a tri-shutter card with a small envelope to hold a gift card that I forgot to photograph prior to sending) but, of course, I wanted this one to be a masculine masterpiece.


Here's my Dad's card:


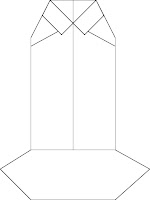
Once again, I decided on a variation of the tri-shutter card, but I added a panel to the front to give it a full front so I could attach an origami shirt which this time serves as my gift card holder.

To learn how to make a tri-shutter card check out my June 2009 Independence Day card.

Here's how to make the origami shirt:

Materials:
Text weight paper, 5 1/2" wide x 8 1/2" long
small scrap of same paper for pocket
small scrap of patterned designer paper for tie.

Instructions:

     • In portrait orientation, lightly score the text weight paper at 1 3/8" and 4 1/8".


     • Fold the top of the paper down about a half inch. Turn the paper over.

     • Valley fold the paper on the score lines. The edges of the paper should meet at the center line of the paper.

     • Fold the top left corner at an angle so that the tip of the corner meets the center line about 3/4" from the top. Repeat with the right corner.


     • Fold the bottom up about 1 1/2". Crease well. Unfold.

     • The next step is a little tricky; it is a type of origami squash fold. The edges that are against the center line need to be separated and pulled away from the center, right at the crease line just made, while leaving the edges together at the bottom edge, and while re-folding on that crease line. This will make the sleeves.


     • Insert the gift card between the front edges, and slide down to the bottom crease.

     • Bring the bottom crease upwards to align with the point where the collar folds meet at the center line. Crease at the fold point.

     • Tuck the bottom crease under the collar to hold in place.
  
     • Use the scrap paper to make a pocket shape. Glue in place along left, right, and bottom edges of the pocket.

     • Use designer paper to make a necktie. Tie a knot in a long strip of the paper; trim off excess on one side of the knot. Trim the end of the remaining potion into a tie shape. Glue in place on the front part of the card (the part that tucks under the collar).


     • Pull down the front of the shirt to retrieve the gift card.