Here's my Dad's card:

Once again, I decided on a variation of the tri-shutter card, but I added a panel to the front to give it a full front so I could attach an origami shirt which this time serves as my gift card holder.
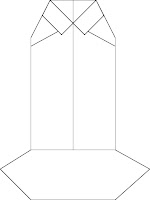
Here's how to make the origami shirt:
Materials:
Text weight paper, 5 1/2" wide x 8 1/2" long
small scrap of same paper for pocket
small scrap of patterned designer paper for tie.
Instructions:
• In portrait orientation, lightly score the text weight paper at 1 3/8" and 4 1/8".
• In portrait orientation, lightly score the text weight paper at 1 3/8" and 4 1/8".
• Fold the top of the paper down about a half inch. Turn the paper over.
• Valley fold the paper on the score lines. The edges of the paper should meet at the center line of the paper.
• Fold the top left corner at an angle so that the tip of the corner meets the center line about 3/4" from the top. Repeat with the right corner.
• Fold the bottom up about 1 1/2". Crease well. Unfold.
• The next step is a little tricky; it is a type of origami squash fold. The edges that are against the center line need to be separated and pulled away from the center, right at the crease line just made, while leaving the edges together at the bottom edge, and while re-folding on that crease line. This will make the sleeves.
• Insert the gift card between the front edges, and slide down to the bottom crease.
• Bring the bottom crease upwards to align with the point where the collar folds meet at the center line. Crease at the fold point.
• Tuck the bottom crease under the collar to hold in place.
• Use the scrap paper to make a pocket shape. Glue in place along left, right, and bottom edges of the pocket.
• Use designer paper to make a necktie. Tie a knot in a long strip of the paper; trim off excess on one side of the knot. Trim the end of the remaining potion into a tie shape. Glue in place on the front part of the card (the part that tucks under the collar).

• Pull down the front of the shirt to retrieve the gift card.


No comments:
Post a Comment